Summary
The number one thing that our technicians are asked once our customers have their system programmed is “How do I close out my POS System at the end of the day.” This guide will walk you through the process of running your end of day reports and closing out your BPA restaurant system. Below is a list of functions that you will want to make sure you run every day. This guide also contains optional steps for gathering additional information from the system.
Procedures
1) Print The Daily Sales and Tips Report
2) Close The Cash Drawer
3) Post Table Sales
4) Backup And Exit
Daily Sales and Tips Report
The daily sales and tips report is a simple and convenient report that you can run as part of your end of day for either an individual server or for a daily total. It is the only report in the system that is designed to be printed on your receipt printer. To run this report, simply go to Restaurant System>Daily Sales and Tips Report.
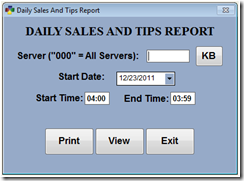
You can enter “000” for a report of total sales in the system or you may enter an individual server number. If your servers carry their own bank you will use this report to settle the server’s sales and tips at the end of their shift. This report lists total sales, tax, tips, guest count, table count, as well as a summary of sales by product type. This report can be set to run over midnight if your business hours run past midnight. Simply change the start and end time as in the example above.
Closing the Cash Drawer
Configurations
The Close Cash Drawer function that is built into the software will assist you in making sure your drawer matches your sales and allow you to track and report on differences that may arise. Depending on the configuration of your system these procedures may need to be adjusted slightly to make sure your cash drawer will match up. We will go through several scenarios here.
Scenario 1 – One Station System, No Server Bank
This is a fairly straight forward setup. If your servers are not carrying their own bank, all the cash should be put directly into the drawer and it should come out matching at the end of the night.
Scenario 2 – One Station System with Server Bank
In this scenario you have a drawer on your system and your servers are also carrying their own bank. In this situation the proper procedure would be to print the daily sales and tips report and settle the cash amount with your servers. You will then put the cash that you collected from them into the drawer. Do this for each server and then close the drawer.
Scenario 3 – Multi-Station System With One or More Drawers and Server Bank
An example of this setup would be a restaurant where the servers have their own bank and a bartender uses the drawer. The ideal way to set up a system with this configuration is to set up each station with a cash drawer with its own cash drawer number. The cash drawer number can be set by going to Restaurant System>Manager Functions>Misc Definitions. Select the Manager option on the left. Change the option that says “Assign terminal cash drawer number” to a unique number from the other stations.
Once the cash drawer number is set the only sales that will go under that cash drawer number are the sales that are closed on that station. This way your bartender will be able to close their drawer without interfering with the servers bank and vice versa.
Note: In all scenarios the system is going to assume that you have paid your servers credit card tips to them out of the drawer before the drawer is closed.
Closing the Drawer
Closing out the actual drawer can be done by going to Restaurant System>End Of Day Processing>Close Cash Drawer. Enter the cash drawer number you are closing out and hit Enter.
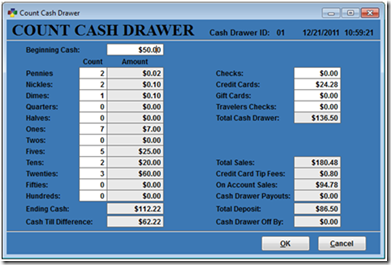
In the beginning cash amount field enter the amount that was in the drawer when you started the day. Use the denominations on the left side of your screen to help you count down the amount in your drawer at the end of the day. You will see the ending cash amount at the bottom of the screen change, along with the cash till difference.
The system automatically fills in the checks, credit cards, gift cards, and total sales fields for you based on the sales that have been closed under that cash drawer number.
Once you have entered the beginning and ending till the “Cash Drawer Off By” amount in the bottom right corner should come out to zero if the drawer is exactly on.
Once you are satisfied with the numbers entered here simply select OK. You will be asked if you would like to print a Cash Drawer Audit Report. After making your selection you will be asked if you are ready to close and clear the cash drawer. Selecting Yes will set all the totals in the drawer back to zero for the next day or shift. Selecting No will leave all the amounts entered in the cash drawer close screen.
Posting Table Sales
Posting table sales is a function that should be run every night. Posting the sales does a number of things: It records the sales permanently in the system, it populates certain reports such as your monthly and yearly sales reports, it records your sales in the general ledger, it posts any on account sales to the account, and it deducts inventory quantities from inventory. Even if you are not using many of these functions it is important to post to keep the software running optimally.
To post your table sales simply go to Restaurant System>End Of Day Processing>Post Table Sales.
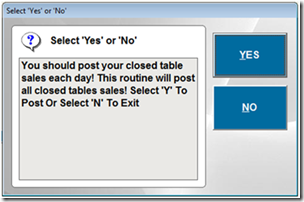
The system will notify you that this is something that you should do every night and ask you if you would like to continue. Select Yes to continue posting. The system will then notify you that it is posting sale and then ask if you would like to print a posting report. This report is broken down by server. Each server’s totals will print on this report. The report includes such information as sales/guest, total tables and total guests. You will need a full size 8 ½ x 11 printer to print this report.
Z Reports
If you are familiar with a regular cash register system you have probably run Z reports on a regular basis. Running the Z reports in the system is not a required end of day function. Typically the posting report will have much of the same information as the Z-1 report. However if you are more familiar with Z’ing out a system these reports are provided for your convenience.
The Z reports are located under Restaurant System>End Of Day Processing.
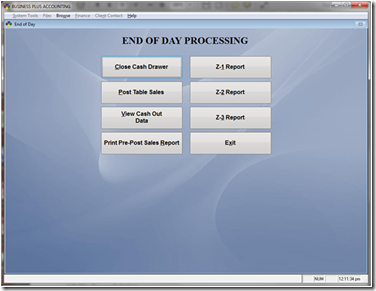
There are 3 different Z reports. These reports each contain sales data for different periods of time. You decide what the time periods will be. Generally the Z1 report is run each day. After running the report the software asks you if you are ready to clear the Z1 totals. If you say “Yes” the software saves the current Z1 totals for the Z2 report. The Z2 report can be run weekly or monthly or whenever it works best for you. After running the Z2 report the software asks you if you are ready to clear the Z2 totals. If you say “Yes” the software saves the current Z2 totals for the Z3 report. When you run the Z3 report the Z3 totals are cleared.
Again you will need a full size 8 ½ x 11 printer to print these reports. They are not designed to print on your receipt printer.
Additional Reports
For many customers the reports discussed above are typically sufficient information to document your daily sales. However they may not give you all the information you are looking for. Here we will note several additional reports that our customers find useful as part of their end of day. Please keep in mind that this is by no means an extensive list of reports in the system.
Summary Sales Report
The summary sales report can be found by going to Restaurant System>Manager Functions>Restaurant Reports>Summary Sales Report. This report lists much of the same information that the posting report does, however it allows you to specify a time frame. If you forget to post for a day your posting report will show multiple days worth of sales when you post. You can run this report to get totals for just one day or you may choose to run it for a week or more. It is also useful for finding servers tip totals for an extended period of time.
Food Cost Report
Many times our customers like to see their total food costs or the total quantity of particular items sold for the day. The food cost report gives you this information. If can be found by going to Restaurant System>Manager Functions>Restaurant Reports>Food Cost Report. This report may be run for one day or an extended period and also may be run for one particular employee.
Daily Sales and Labor Report
Tracking sales verses labor costs may be one of the most important things your system will track for you. The daily sales and labor costs breaks down your employee hours, labor costs, and sales. Keep in mind that in order for this report to be accurate you must be using the time clock and have hourly or salary rates entered on your employee records. For information on doing this please see our Restaurant Professional Quick Start Guide.
Backup and Exit
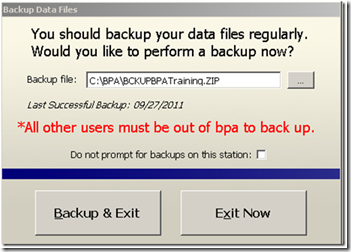
Running a backup and exit in the system accomplishes two things. The first is obvious: It backs up your data so in the event of a system failure your information can easily be restored. The second thing this accomplishes is a function we call packing. Every order that is entered into the system creates temporary records in the system that must be cleared out occasionally. Over time if this is not done you will notice the POS screen running increasingly slow. When the backup and exit is run it cleans out these temporary records to keep your system running at top speed.
Our latest Business Plus Accounting update contains expanded backup functionality. We now allow you to specify multiple backup locations for your Business Plus Accounting software. For example, you can create a backup somewhere on your server computer, on another computer on the network, or on an external hard drive.
We recommend that you back up your BPA software every day. However, if you forget to backup your system, after 7 days, a reminder will appear letting you know that a backup needs to be performed. We also recommend that you backup your BPA software to an external hard drive or a thumb drive so in the event that your computer crashes or is stolen your data can be easily restored.
Setting up Backup Locations
Backup locations are setup in the Restaurant System>Manager Functions>Misc Definitions. Click on the “Business System” option, then click the  button.
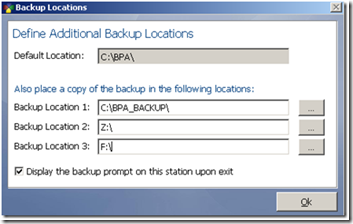
When performing a backup, BPA will automatically create a backup onto the main server computer. You will be able to see this backup by going to My Computer (or Computer in Windows Vista/7)-->C drive-->BPA . However, you may also specify a different folder on the server computer by using one of the additional backup locations.
It is recommended that you have a dedicated external hard drive or thumb drive for backups. This drive should always be plugged into your server computer.
NOTE: If you are backing up to a thumb drive, we recommend that you purchase at least a 2GB thumb drive.
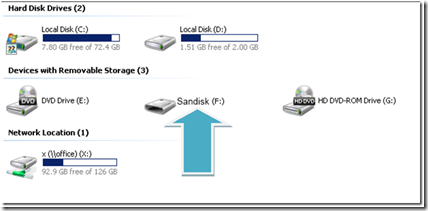
After you have plugged the external drive or thumb drive into the server computer, Windows will then assign it a Drive Letter (i.e. F: or G:). You will need to find this drive letter, and add it to one of your backup locations. To find its drive letter, go to My Computer (or Computer in Windows Vista/7) and take note of the drive letter.
How to Perform a Backup
1. Close the BPA Software on all of your client (secondary) systems.
2. On the server(main) computer, exit the software on this system. When you exit, you will be presented with the option to Backup and Exit. Go ahead and choose Backup and Exit.
