A report from the National Archives & Records Administration in Washington, DC contains the following statistics about computer data loss:
A hard drive crashes every 15 sec.
1 in 5 computers suffer a fatal hard drive crash during their lifetime.
25% of lost data is due to the failure of a portable drive.
31% of PC users have lost all of their PC files to events beyond their control.
32% of data loss is caused by human error.
60% of companies that lose their data close down within 6 months of the disaster.
(source:https://www.archives.gov/preservation/conferences/papers-2003/puglia.html)
Our Tech Support department will often see users backup their BPA software only to their server computer. However, if this hard drive crashes, we have no way to recover the backup.
Our latest Business Plus Accounting update contains expanded backup functionality. We now allow you to specify multiple backup locations for your Business Plus Accounting software. For example, you can create a backup somewhere on your server computer, on another computer on the network, or on an external hard drive.
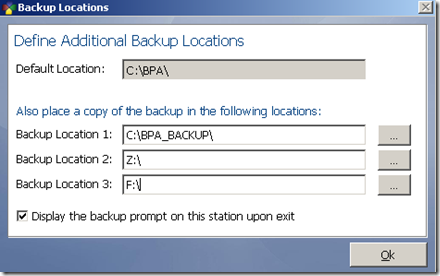
We recommend that you back up your BPA software every day. However, if you forget to backup your system, after 7 days, a reminder will appear letting you know that a backup needs to be performed.
We also recommend that you backup your BPA software to the following locations:
- To your server computer
- To an external hard drive or a thumb drive
- (If you have multiple stations) To another computer on the network
How Are Backup Locations Setup?
For Restaurant Pro/Delivery Pro/Hotel and Property Management Customers
Backup locations are setup in the Restaurant System-->Manager Functions-->Misc Definitions. Click on the “Business System” option, then click the  button.
For Retail Touch POS Customers
Backup locations are setup in Touch Screen POS-->POS Manager Functions-->Misc Definitions. Click on the “Business System” option, then click the  button.
Backing Up To Your Server Computer
When performing a backup, BPA will automatically create a backup onto the main server computer. You will be able to see this backup by going to My Computer (or Computer in Windows Vista/7)-->C drive-->BPA .
However, you may also specify a different folder on the server computer by using one of the additional backup locations.
Backing Up To An External Hard Drive Or Thumb Drive
It is recommended that you have a dedicated external hard drive or thumb drive for backups. This drive should be always plugged into your server computer.
NOTE: If you are backing up to a thumb drive, we recommend that you purchase at least a 2GB thumb drive.
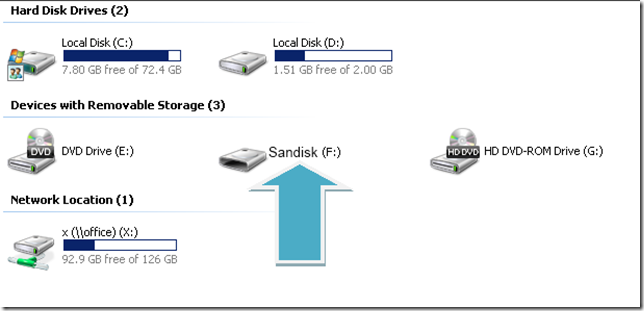
After you have plugged the external drive or thumb drive into the server computer, Windows will then assign it a Drive Letter (i.e. F: or G:). You will need to find this drive letter, and add it to one of your backup locations. To find its drive letter, go to My Computer (or Computer in Windows Vista/7) and take note of the drive letter
Backing Up To Another Computer On Your Network
If you have multiple stations, you can also setup a backup to another computer. To do this, you will need to share a folder on the destination computer, and then create a mapped network drive on your main server computer to this shared folder.
Creating the Shared Folder
For Windows XP
1. Locate or create the folder that you want to share.
2. Right click the folder then choose Sharing and Security.
If this is the first time you have shared a folder on this computer, click the link “If you understand the security risks by want to share files without running the wizard, click here”. On the next prompt, place a checkmark next to “Just enable file sharing” and press OK.
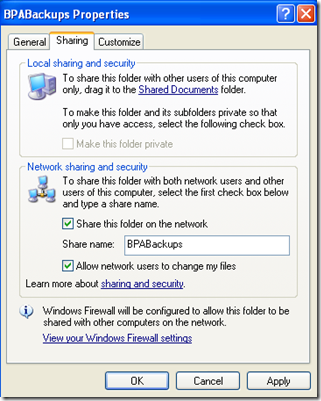
3. Under the Sharing tab, place a check mark next to Share this folder on the network and Allow network users to change my files. Also, take note of the Share name (you can change this name if you wish).
4. Press OK when finished.
For Windows Vista/7
1. Locate or create the folder that you want to share.
2. Right Click on the folder, then choose Properties.
3. Go to the Sharing Tab, then click the Advanced Sharing.
4. Place a checkmark next to Share This Folder.
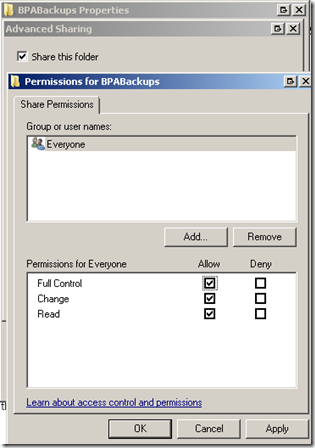
5. Click the Permissions button.
6. Highlight the “Everyone” user, and under the Allow column, place a checkmark next to Full Control.
7. Press OK when finished.
Find the Computer Name of the Destination Computer
Next, you will need to know the computer name of the destination computer. To find the computer name, perform the following steps:
For Windows XP
On the computer that you have created the shared folder, right click on My Computer, then click Properties. Go to the Computer Name tab. Take note of the “Full Computer Name”.
For Windows Vista/7
On the computer that you have created the shared folder, right click on Computer, then click Properties. Take note of the “Computer Name”.
Map a Network Drive to your Shared Folder on the Main Server Computer
Finally, you will need to map the network drive on the main server computer. To do this, perform the following steps:
For Windows XP
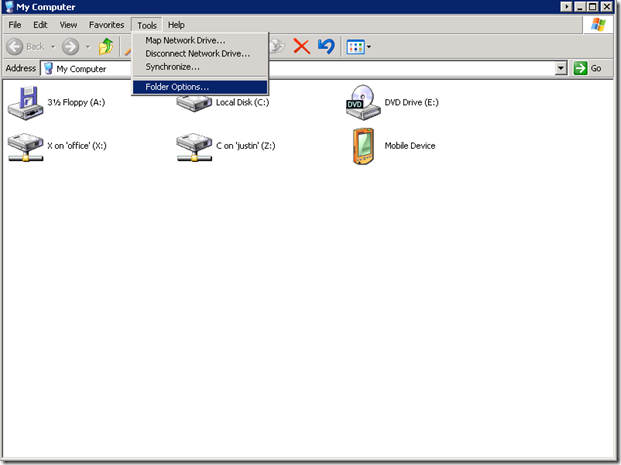
1. Open My Computer
2. At the top of My Computer, go to Tools—>Map Network Drive
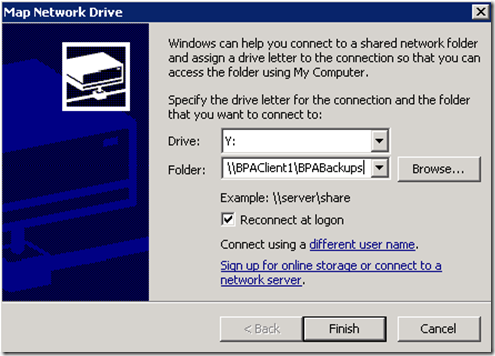
3. In the “Drive” field, select the drive letter you wish to use for the Shared Folder
4. In the “Folder” field, enter in “\\Computer_Name\Share_Folder_Name” (without quotes).
For example, if the destination computer name is “BPAClient2” and the folder you shared is called “BPABackups”, then you would type in “\\BPAClient2\BPABackups” (without quotes).
5. Place a checkmark next to “Reconnect at logon”, then press Finish.
For Windows Vista/7
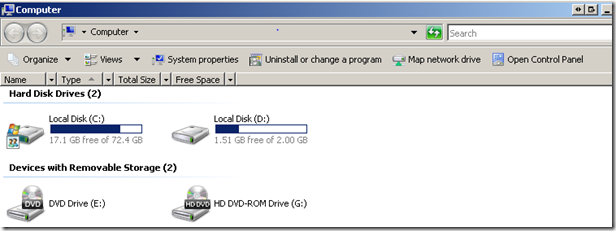
1. Go to Start, then Computer
2. At the top of Computer, click the “Map Network Drive” button 
If you do not see the Map Network Drive button, then go to Tools—>Map Network Drive
3. In the “Drive” field, select the drive letter you wish to use for the Shared Folder
4. In the “Folder” field, enter in “\\Computer_Name\Share_Folder_Name” (without quotes).
For example, if the destination computer name is “BPAClient2” and the folder you shared is called “BPABackups”, then you would type in “\\BPAClient2\BPABackups” (without quotes).
5. Place a checkmark next to “Reconnect at logon”, then press Finish.
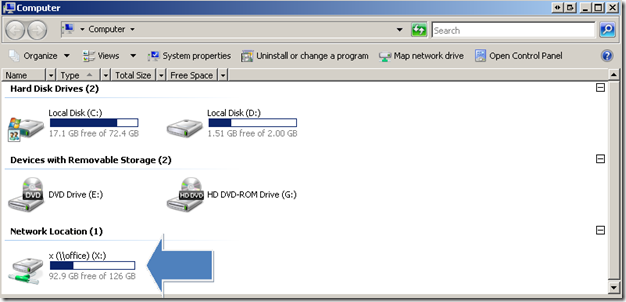
You should now have a new drive in your My Computer (or, Computer in Windows Vista/7) that connects to the shared folder.
Adding Backup Locations to your BPA Software
When performing a backup of your BPA software, the system will automatically create a backup on the main server computer. To setup your additional backup locations in the BPA Software, perform the following steps:
For Restaurant Pro/Delivery Pro/Hotel and Property Management Customers
1. Go to Restaurant System-->Manager Functions-->Misc Definitions.
2. Click on the “Business System” option, then click the  button.
3. In the Backup Locations 1-3, enter the Drive Letters/Folder locations you wish to send backups.
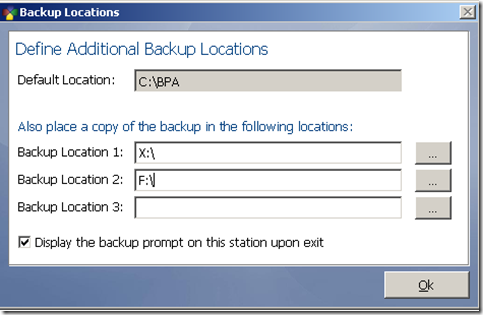
4. Press OK, then Save and Exit to finish.
For Retail Touch POS Customers
1. Go to Touch Screen POS-->POS Manager Functions-->Misc Definitions.
2. Click on the “Business System” option, then click the  button.
3. In the Backup Locations 1-3, enter the Drive Letters/Folder locations you wish to send backups.
4. Press OK, then Save and Exit to finish.
How to Perform a Backup
1. Close the BPA Software on all of your client (secondary) systems.
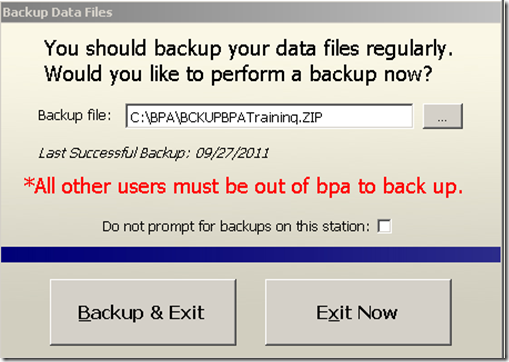
2. On the server(main) computer, exit the software on this system. When you exit, you will be presented with the option to Backup and Exit. Go ahead and choose Backup and Exit
You will need to update your BPA software to enable these features. Give our technical support a call at 801-336-3303 to help you perform this update.